
Wallace

Wallace is a short poetic film about saying goodbye when you have 24 hours left to live. The film reflects on the idea of what it means to be human and finding connections in our relationships.
Our set-up was the Blackmagic Pocket 4K with a Canon 24-70mm F2.8 lens. The crew was very minimal, consisting mainly of the Director Ali Jahani, Producion Designer Valentina Serebrennikova, Camera Assistant Sam Vella and myself. Because we had a small crew we needed to be very prepared and we had as many location scout days as there were shoot days. Occasionally we would return to a location multiple times when necessary because we had to be sure we could achieve what we needed. Coming back from the scouts I would put together a short pre-vis animation to show the crew what we were planning to do.
The following breakdown below describes the set-ups at each location and my thoughts about why we had to do it that way or what I would do differently next time.
Telephone Booth


The difficulty in finding the right phone booth was determined by the background. I wanted to find a background with depth, ideally with the glass panels looking down the street so that we could see street lights and reflections in the background but all booths we visited faced to the side. We finally settled on one where we had enough space to not obstruct the public but also had enough depth to place lights on the other sidewalk if necessary.
In this scene, Wallace calls his parents to say goodbye while it’s raining. We wanted to create a cool blu-ish tone so it felt cold and distant. There were 3 lights in total, a Nanlite Pavotube 15C on 3200K to mimic a street lamp on the left, an Aputure MC at 6000K to enhance the top-light coming from the booth and a Falconeyes F7 as a backlight kicker on the right. The camera was balanced to 3200K to push the blue tones even more. I had a blanket set-up behind me to prevent my shadow and any reflections from hitting the front glass panel.
In order to hide the fact that we filmed on a dry summer night we had to stay tight on Wallace and use a spray bottle on the windows between takes to refresh the rain.

Uber


We mounted the camera on the car using 2 Manfrotto Pump Cups and 2 Friction arms to the top and bottom of the camera cage. The biggest concern I had for this scene was the oncoming traffic and the suction cups falling off but luckily there were no issues.
A small Aputure MC was stuck to the interior roof of the car and was at 15% brightness just to give an edge to the darker side of his face. The rest of the shot was lit with available light from any stores that were operating during the night.
The focal length of the camera was set to 35mm with an Aperture of F2.0 at ISO3200.
Restaurant
When it came to discussing the coverage for this scene, I re-created the environment in UE4 so that I would be able to put together a short animatic showing the Director beforehand how the angles which we discussed may look like.
The heart of the scene comes from Wallace seeing a family out for dinner and from wishing to be part of that enters the shop but is ultimately left alone again when they leave.

Pre-vis and final shot of the opening sequence

Pre-vis of the Wide

Pre-vis and Final OTS on Wallace

Pre-vis and Final - High Angle
The restaurant was only open to us after they had closed at 9pm and they gave us 3 hours to shoot and wrap by midnight. With that pressure we had to know exactly what we were going to do.
I wanted to keep the look dramatic by side lighting from the kitchen. The concept was to have the warmth coming from the kitchen closer to the family and having Wallace sit as far away as possible. In the High Angle shot you should be able to see a gradual declining in intensity going from table to table. To achieve this I had all the bulbs taken out of the overhead lamps as they were all different sizes and colour temps and just bounced light from above until the right falloff was reached. I also had a Nanlite 15C tuned to Red backlighting him to simulate the red exterior neon sign of the restaurant.

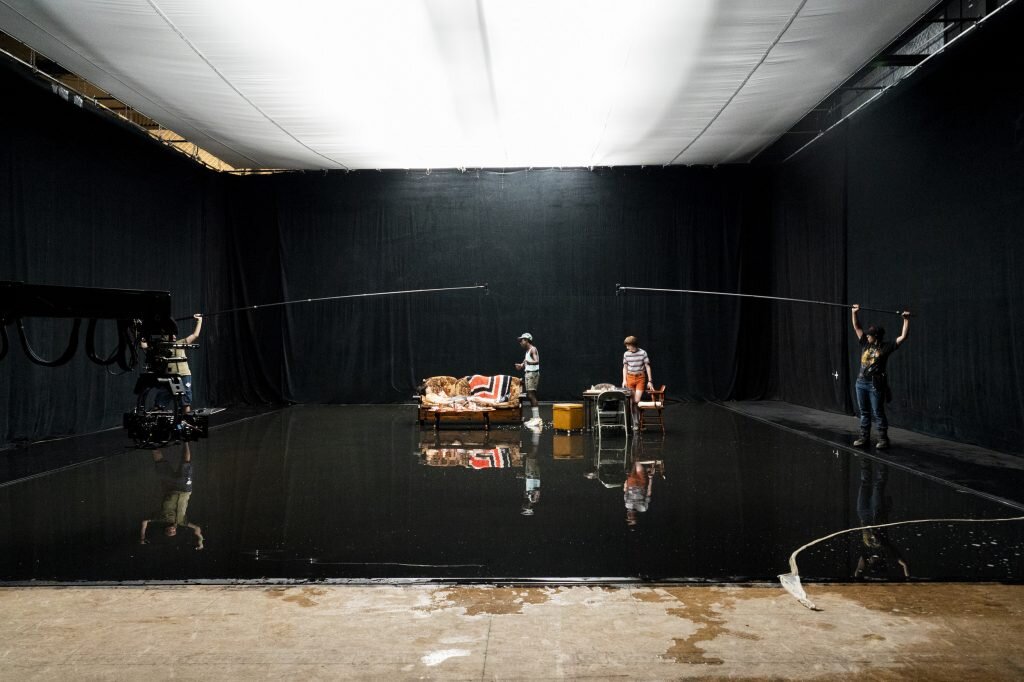
The Void
Despite looking very simple this scene was actually the most expensive to shoot. We had to rent a studio for half a day as well as a dolly, purchase builder film, multiple china balls and bulbs. The look was based off the series Stranger Things but the difference was that our lead would not be moving.


In order to get the reflection on the floor we had to create a pool of water 2-3cm deep. We did this by sticking 2 builders sheet together to make a 4m x 5m sheet and hung them over a few planks of wood to create a small pool of about 2-3cm deep. An unexpected challenge was the reflectiveness of the builders film which we fixed by simply placing blacks around the edge. Creases inside the pool itself also created reflections but we smoothed it out and brought the creases under the height of the water to solve that issue.

Step 1. Build Wooden Pool Frame

Step 2. Hang Lights and place the film over the area

Step 3. Use blankets to cover reflective areas and fill the pool
Reference set-up on Stranger Things

Our low-budget setup

The lighting used for this set-up were all purchased from IKEA. In total the lighting cost us around $145 to execute. The Lanterns were 45cm Regolit Pendant Lamp Shades ($7) with 1000lm E27 Tradfri LED Light bulbs ($20) hanging from Strala E14 Cord Sets ($4.20) with E14 - E27 bulb mount adaptors ($5) from eBay.
An extension was run up the side of the wall and connected to the 4 lanterns that were hung off C-stand arms and clamped to the truss with super clamps.
The drawback with this set-up was that the cords were limited to 7W which limited the output of the bulbs. Given a bigger budget and time, proper E27 cord sets could’ve been sourced that allows for more output and flexibility.
For future shoots, I would recommend having the subject wear non-black clothing to have a stronger reflection in the water. The black suit and pants barely reflected at all and almost made the effort of setting up the pool worthless. Also, even though the walls and floor were painted black, they were still quite reflective. Post-production techniques such as power-windows still have to be used on the footage to get the void deep-black.
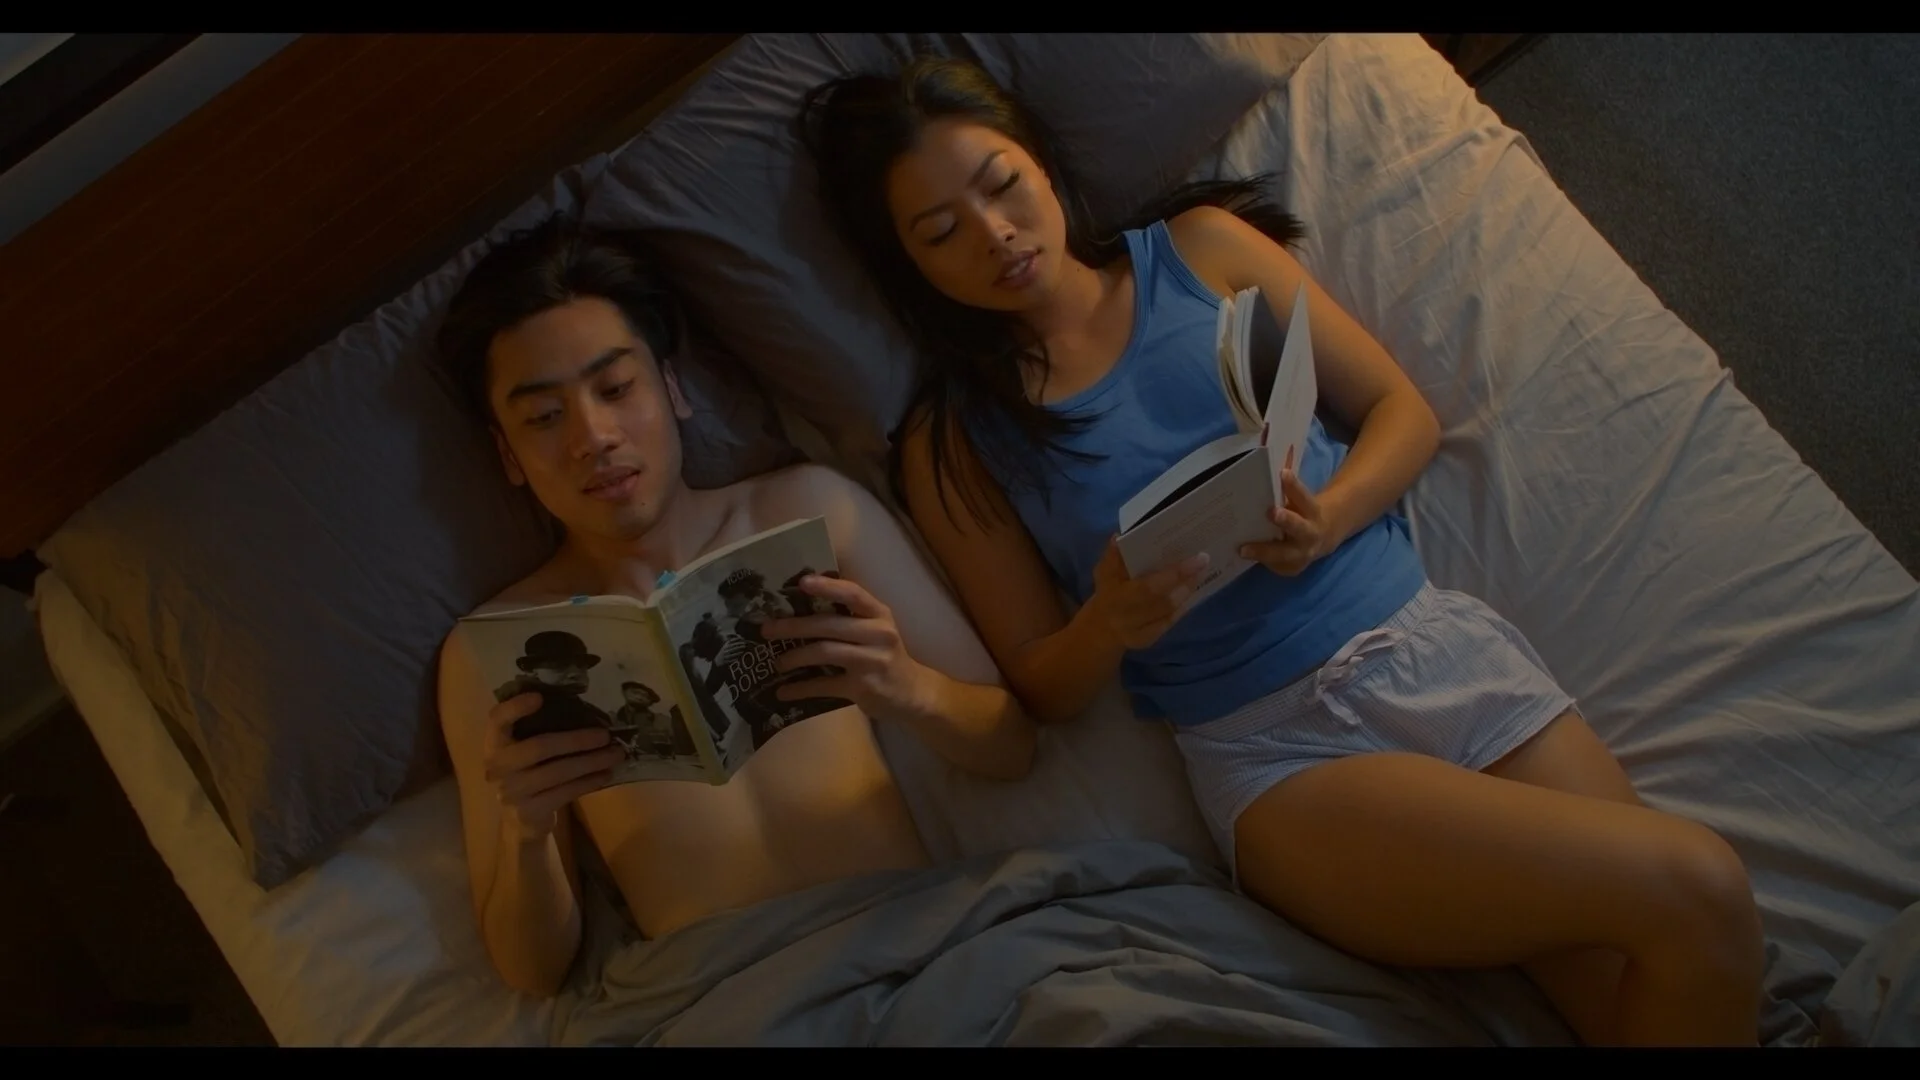
The Bedroom
This scene is about the transition of a relationship between a couple over night. There were 4 different set-ups needed to show the transition of night to day.
1. Night - 11PM

3. Night - 5AM

2. Night - 1AM

4. Morning - 7AM
The set up was done during the day by blacking out the balcony window and using a Godox SL-60W with a 1/2CTB as our moonlight. This eventually changed to a Pavotube 30C which we bounced into the ceiling and into a diffuser over the bed to get an even softer ambient night feel. I carried this night set-up through to the morning but slowly dimmed the 30C as we added more sunlight. Our sunlight was created literally by just raising the blacks and letting the natural sunlight in. Eventually we lit them purely with natural light for the final set-up.


For the close up shot of the girlfriend we had 2 lights; a Luxi Cello and an Aputure MC acting as kickers to separate her out of the background and a dedo was used to create a spot on the wall for some variation. A white reflector was also used in front of the camera to fill in the shadows. My reference shot for this was the opening and closing shot of Rosamund Pike from Gone Girl. From analysing the picture I knew that I needed a soft key light and 2 kickers to separate her from the background. You can see the white outline of the backlight on her shoulder and cheeks as well as on her hair on the right. There is also a catch light in the eyes which I did not replicate. From my set-up the light that made all the difference was the Aputure MC that was used on camera right to give a kicker on our actresses cheeks and shoulder. Without it, the shot would have been much flatter.


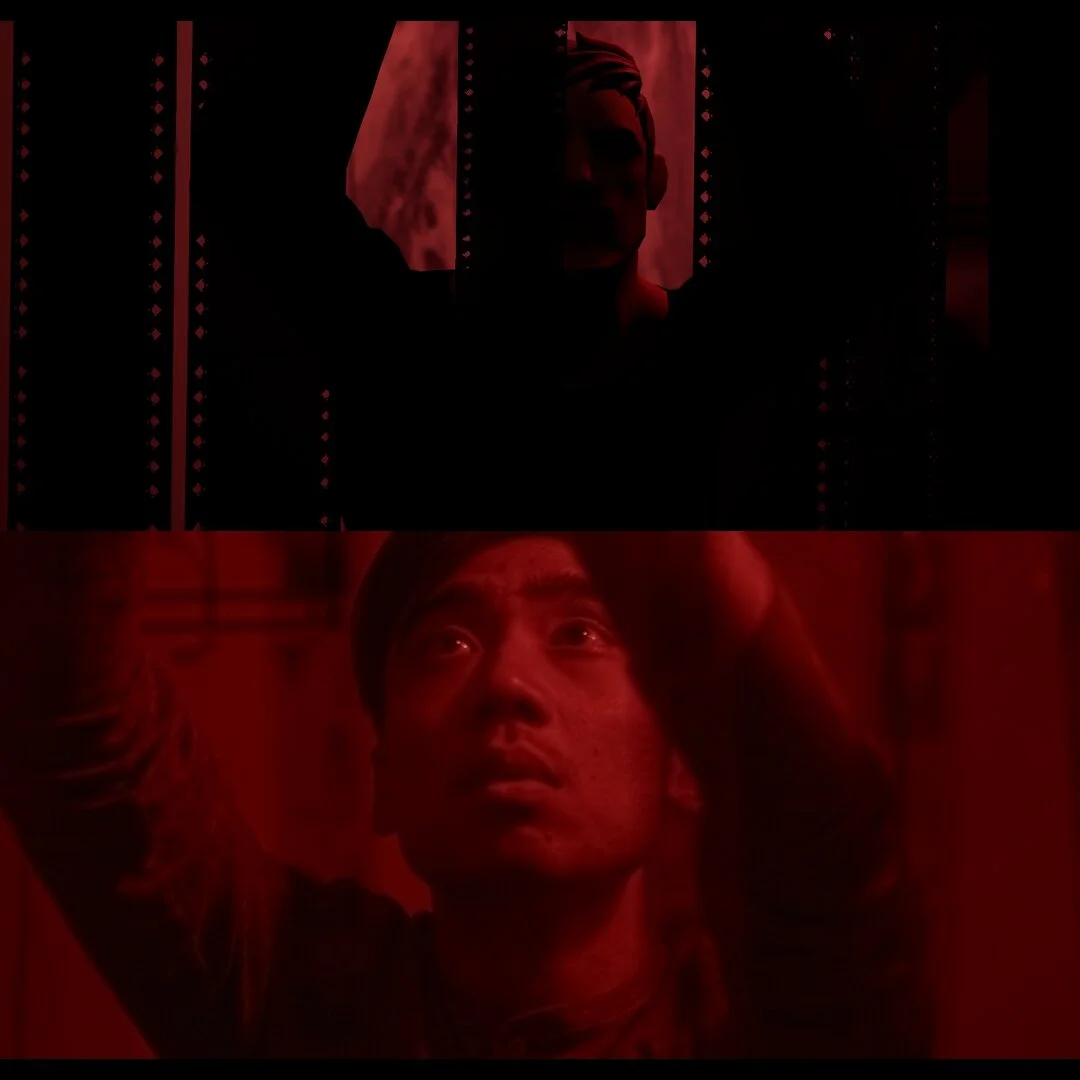
The Darkroom
This scene had the simplest set up of the whole shoot but it required unconventional methods to set up. I knew that we wouldn’t be seeing the source of the red light so I could use any source that had RGB to do the job. I mounted both an Aputure B7C and an Aputure MC to the toilet wall between the actor and the film negatives because a single source did not give me enough exposure at max brightness. The B7C was crab-clamped onto a car mount with an E27 bulb adaptor otherwise we’d had to hang it off a C-stand which would have restricted our movement in the bathroom. A black blanket was also taped to the opposite wall to reduce the bounce and increase the contrast. Given more time, I would have blacked the ceiling as well. The shower head was bagged because I had to shoot Wallace from inside the stall in order to get more space.

The Aputure B7C and Aputure MC were used to create the red safelights of the dark room.
Pre-vis vs Final Frame
The Lounge - Opening and Closing Frames
The opening and ending shot of this film are identical in camera movement but they had to be filmed a few hours apart to adjust for the skylight. We only had a window of 15 minutes to shoot the opening shot before the background light forced us to move on. We had to capture it at blue hour or there wouldn’t be any detail or colour in the sky. I wanted to make sure there was a definite difference between the two shots and that was through the background.
The design of the opening shot was meant to establish what was important in Wallace’s life as well as the state of mind he was in. The unorganised table filled with photographic paraphernalia represented disorganized thoughts of the past, Wallace is reminiscing the past from photos he’s taken and it’s at the center of his mind.

Opening Frame Start

The Opening shot End

The Closing Shot Start

Closing Frame End